Introduction
In the first part of this article, we checked out how to use the android.util.Log class to log messages for different levels such as DEBUG, INFO etc to the log output. We also saw that we could check the current logging level for the current tag. This is provided through the isLoggable(String tag, int level) operation. We have also seen that the default level of any tag is set to INFO. Now in this section, we will see if we can change the default logging level of the application for a specific tag through the code and if not then whether we can have an alternate implementation.
Ways of changing the default log level for a tag
As per the official documentation provided by Android, there are only a couple of ways to change the Log level for the android.util.Log class. They are as mentioned below.
- Set a system property: ‘setprop log.tag.< LOG_TAG> <LEVEL>’ Where level is either VERBOSE, DEBUG, INFO, WARN, ERROR, ASSERT, or SUPPRESS.
- Create a local.prop file that with the following in it: ‘log.tag.<LOG_TAG>=<LEVEL>’ and place that in /data/local.prop.
We have checked how we can set the property by connecting to the ADB shell and then isssuing the command. Since it involves changing the property, we can explore if we can set the property through Java code. However, System.setProperty() stores a totally different set of properties compared to the properties that can be accessed by the getprop command that can be issued at the ADB shell. Hence even if you try to use the System.setProperty() to store the log level for a tag, it will not work.
So what is the choice? Let us understand what we are trying to achieve. We want to log debug statements so that they can be viewed in LogCat tool. We already know that irrespective of the logging level set, all the statements are logged into the log file (except for debug statements – since they are stripped outside of the release build). We need some control through the code – probably through a preference settings by which we can log the statements into the logfile which can be easily viewable in Logcat tool.
Approach
Since by default, the debug statements are stripped out of release builds, what we will do is that we will log all our statements using the level INFO. We will wrap all our statements in an IF condition to check the default log level of our application. We will make the default log level of our application as WARN. This means that by default our logger will not write the INFO statements. When we want to actually debug the application on the device, we will change the log level of the application to INFO, so whatever log statements we have put in our application will be written to the log file.
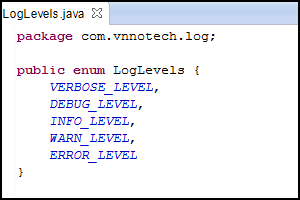
We will be creating two Java files. One is an enum that contains the Log levels specific to our application. The second is a custom Logger class that wraps the actual Android.util.Log class behavior. Please check the code for the two classes below.
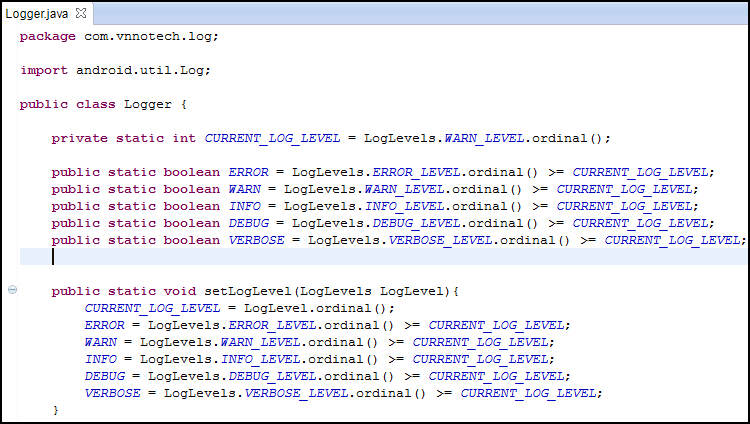
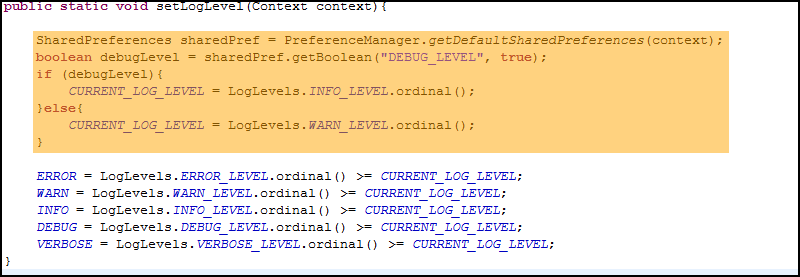
Now we will include this enum in our Logger.java class. Please check the code below. It shows the various Log levels in action. We have defined the various boolean values as static member variables in our Logger class. The current log level that is set in this class defines which of the boolean condition is true. We will follow the same convention as that of Log levels followed by the android.util.Log class except that we will make the default level as WARN. This means that when we write the log statements in our application, log levels of INFO, DEBUG and VERBOSE will not be written by default. Only log levels of WARN and ERROR will be written to the logs in the application and can be viewed in the LogCat tool. If want the log levels of the INFO to be written to the log file, then we have to set the CURRENT_LOG_LEVEL to LogLevel.INFO_LEVEL. This can be done through the setLogLevel(LogLevels LogLevel) operation as shown in the figure below.
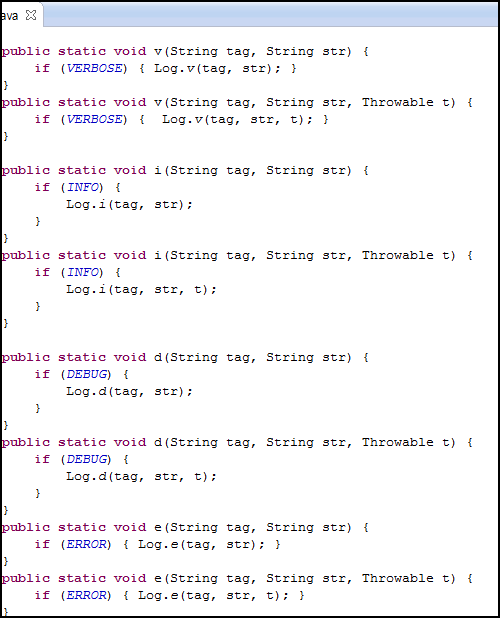
The remainder of the code actual mimics the various log methods provided by the android.util.Log class. For example we have written the operation public static void i(String tag, String str) so the application will use this function in the following manner.
Logger.i(“TAG”, “STRING TO BE LOGGED”);
Notice that the client application does not have to wrap this log statement in IF condition, since the condition of checking the current log level is already present in the Logger class implementation. Thus all client applications need not worry about checking for the conditions and it becomes very easy to use the wrapped android.util.Log statements without having all the log statements being written to the log output by default.
Making the log level configurable
We have provided a wrapper implementation of Logger class which wraps the functionality of android.util.Log class with default Log level set to WARN. So when we deploy our application on the device, only log levels of WARN and ERROR will be logged on the device. But we want the functionality that when we want to turn debugging on, we should be able to turn it on or off on the device pretty easily. For this purpose, we also have one public function setLogLevel(LogLevel logLevel). We will develop one preference activity by which we can set the default log level on the device so that the log levels are truly configurable. Since we do not want to make it very confusing from the end user perspective, we will only provide an option to the user to turn on debugging or turn off debugging. When user turns on debugging, the LogLevel in our application will be set to INFO so that all the logs that we have written in our application will be written into the log file to be viewed in the LogCat tool. When the user turns of the debugging, then the LogLevel would be reset back to “WARN”.
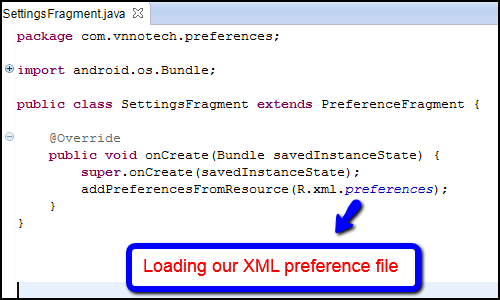
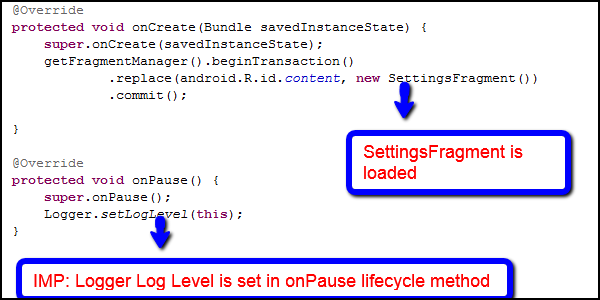
For this purpose, we will create a simple preferences.xml file in the /res/xml folder as shown below. The code for the SettingsActivity.java and SettingsFragment.java are shown after the XML. These are only used to set a preference for the user to turn on or off the debugging mode so that the user can control the logging level.
Last but not the least, we will make a modification to our Logger.java class in the setLogLevel() operation. Now, in this case, we are only interested in setting the log level for info or above. Hence we need to make the modification in the setLogLevel() operation as shown below.
Testing our implementation
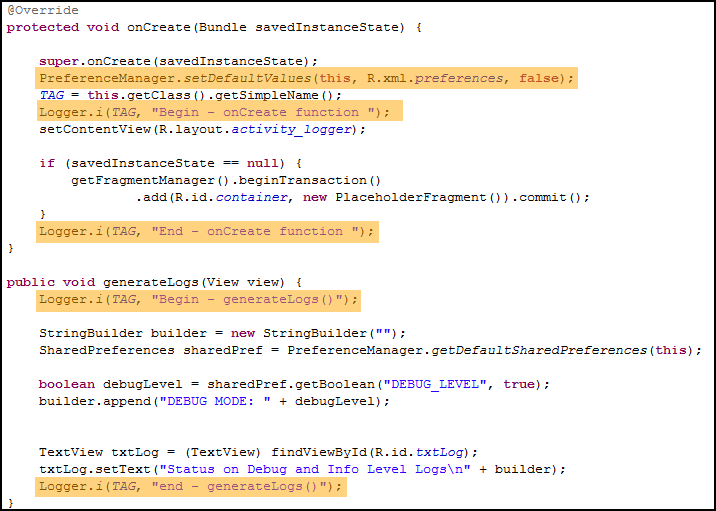
Now that we have made changes to our Logger and also introduced a settings screen, we need to change our main activity code to use the new Logger implementation which should be pretty simple. In the onCreate() method, we first load the preferences that have been defined for this application.
Notice that we directly call the Logger.i() function. We do not need to wrap these logging statements in an IF condition since this is already handled for us within the Logger class implementation based on the default log level implementation which is WARN. The user can now turn on or debugging in the settings screen as shown below.
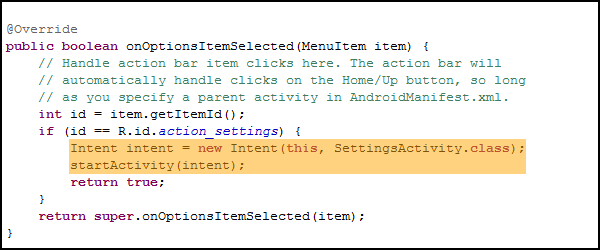
When the user clicks on the settings menu option, we invoke the SettingsActivity screen by creating an intent object and then calling the startActivity() operation. This is shown in the screen below.
User can change the debug settings here. If the user checks the box, it means debugging is on and all the Logger.i() calls will be logged to the log file. If the user unchecks this option, it means debugging is off and all the Logger.i() calls will NOT BE logged to the log file.
Thus we have implemented a simple configurable mechanism of controlling the logs that get generated to the device log file which can be viewed through the LogCat tool. To make the solution truly reusable across multiple applications, we need to put the Logger class, the LogLevels enumeration and the SettingsActivity and SettingsFragment in a library project that can then be used across different applications.
Conclusion
In this part, we took a look at how we can wrap the calls to the android.util.Log operations in our own implementation of Logger class. There are only a couple of ways of changing the Log level which is through the setprop command from the adb shell. But we want to have this option configurable as a setting from our application. So we created an enumeration of the log levels, provided a settings fragment class where user can turn on whether debugging should be on or off for the application. In our implementation, we have kept the default Log level of the application as WARN. When the user turns on debugging, we are changing the log level in our application to INFO. So when user turns on the DEBUG option, all the Logger.i() functions will write their log entries into the log file to be viewed in the LogCat tool. Since the debug statements are removed out of the final release build, we are controlling the Log level INFO through our settings. Thus we have provided a simple configurable way to control the logging from our application which can be turned on for debugging purposes or off when the user does not require it.
Happy Learning!!!

