Yearly Archives: 2014

Creating a signature page using canvas element

Getting user signature using canvas element

Introduction

In this session, we will implement a signature functionality using the canvas element. Along the way, we will check some of the HTML5 elements such as color. We will save the signature on the server.

Intended Functionality

The basic functionality to be provided is as follows.

  1. The user will be able to sign in the provided box (which is a canvas element)
  2. The user will be able to choose a color for the signature
  3. The user will be able to clear the signature
  4. The user will be able to erase the signature
  5. The user will be able to save the signature on the server

The final screen would look as shown in figure below.

Signature Canvas Element

Signature.html

Developing the code

Canvas Element

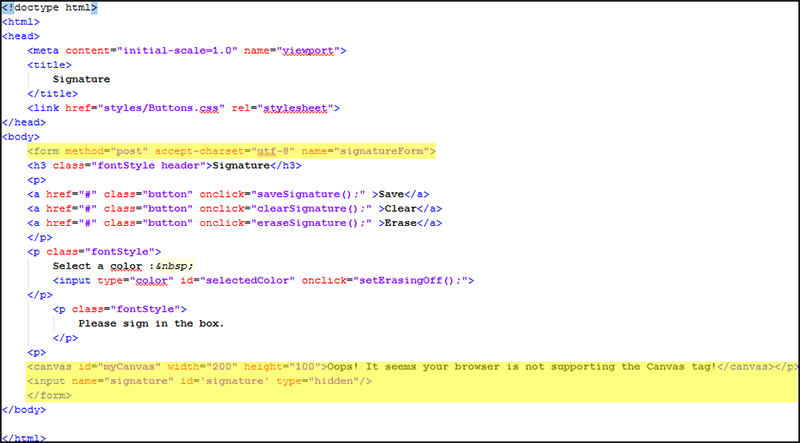
Let us approach the solution one step at a time. The  first functionality that is required is for the user to sign into the provided box. For this purpose, we will create an empty box using the canvas element.  The code for the same is as given below.

Signature Placeholder

Canvas element for signature box

We have defined a canvas element with width as 200 pixels and height as 100 pixels.  We have defined the buttons as links. The links are converted into buttons using CSS  generated from the web site CSSButtonGenerator.com. You can download the CSS file from this link.

Identify the events

Now we expect that the user will be able to draw a signature on the canvas using the mouse. So we need to identify the mouse events on which the user would be able to start drawing the signature as well as stop drawing the signature.

The user should be able to draw the signature when the mouse is down on the canvas event.  The signature will continue to be drawn till the mouse is down. When the mouse up event is fired when the cursor is still in the canvas, the signature should not be drawn. Also when the mouse is down but the user moves the cursor out of the canvas (and does not release the mouse button), then also the signature should not be drawn.   The user should be able to draw the signature when the mouse is pressed down and it moves continuously in the canvas.

This discussion leads to four events as listed below.

  • mousedown – this is when the user should begin drawing the signature
  • mouseup – this is when the user should stop drawing the signature
  • mouseout – this is when the user should stop drawing the signature
  • mousemove – this is when the user should be drawing the signature

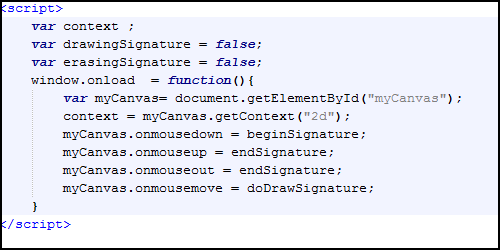
We will configure these event handlers in the window.onload event hander. This is shown in the following figure.

Defining Event Handlers

Configuring Mouse Event Handlers

In addition to defining the mouse event handlers in the window.onload event, we have also defined three global variables  context -> which will be used for drawing the signature on the canvas, and two other boolean variables which will be used in the function handlers to determine whether the signature is drawn on the screen or not.

Defining event handler code

Let us start with the beginSignature, endSignature  and the eraseSignature functions. They are instrumental in setting the boolean variable flags to true or false.

Functions for beginning drawing and setting the boolean flags.

Key Functions for setting up the Boolean flags

In the beginSignature(event) function, the event object is passed to the function from which we can extract the coordinates where the mouse down event has occurred.  We use the context.beginPath() operation to begin a new path for drawing. Then we use the context.moveTo() operation to move to the specific point where the mouse down event occurred on the canvas element.  More importantly we are also setting the boolean variable drawingSignature to the value of true.

In the endSignature() function, we are setting the flag drawingSignature to false. Similarly  in the eraseSignature() function, we are setting the erasingSignature value to false.  We have defined the eraseSignature() function to be the onclick event handler for the <input type=”color”> defined on the HTML page. When the user clicks on any specific color, it means the user does not want to erase existing signature.

Let us now look at the remaining functions.

Drawing

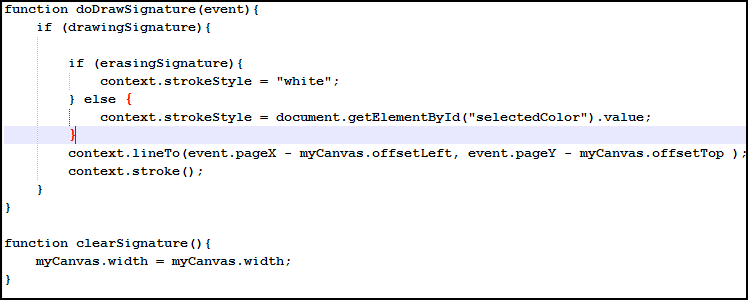
doDrawSignature() and clearSignature()

The clearSignature() function is used to clear the canvas of any existing signature.

The main function is the doDrawSignature() funtion.  In this function, we perform the activity of drawing the signature. We perform this activity only if the boolean flag drawingSignature has been set to true. Then we check the boolean flag erasingSignature. If the user has clicked on the “erase” button, then this flag is set to true. We set the strokeStyle to “white” so that any existing signature is replaced with white strokes simulating the erase operation.

The three main lines of code for the context object are as follows

  • context.strokeStyle  property – sets the color of the stroke
  • context.lineTo() – draws a line from an existing point to the new point
  • context.stroke() – performs the actual stroke of the line

 Viewing the output

The final output is as shown in the figure below.

Output of signature viewed in Google Chrome Browser

Output of signature viewed in Google Chrome Browser

Save the signature

Since we want to save the signature on the server, we would need some server side code. For the purpose of illustration, we will develop a simple code in PHP which we can deploy alongside our HTML.  The PHP code is very simple and displayed below.

Upload Signature Server Side PHP Code

UploadSignature.php

The image from the canvas element is in the base 64 encoded format. In the HTML form, we have created a hidden element. This element is set to the data URL of the canvas element in the saveSignature() JavaScript function. This is extracted in the PHP code. We decode the base 64 data and then store the signature as a file named signature.png in the signatures folder on the server. In this code, we have not put any dynamic file naming scheme for the signature file and the same file will be overwritten when the user draws multiple signatures.

The saveSignature() JavaScript function is shown below. It uses AJAX to invoke the uploadSignature.php() function.

Code For Save Signature Function

saveSignature() function

As shown in the code, we use XMLHttpRequest object to form an AJAX request and then we post the signatureForm data to the uploadSignature.php.  Once the function is invoked the PHP gets invoked and the image file is saved on the server as shown in the screen below.

Signature uploaded on the server

Signature uploaded on the server

Conclusion

In this article, we have used the canvas element of HTML5 to create functionality for capturing the signature of the user. We have also used the color input type so that the user can select the color of the signature.  The code made use of several events such as mousedown, mouseup, mouseout and mousemove to begin and end the drawing of the actual signature.

We also saved the signature on the server by invoking a simple PHP script by using XMLHttpRequst AJAX request.

Happy Learning!!!


29Jul/14

Logging in Android – Part II

Introduction

In the first part of this article, we checked out how to use the android.util.Log class to log messages for different levels such as DEBUG, INFO etc to the log output. We also saw that we could check the current logging level for the current tag. This is provided through the isLoggable(String tag, int level) operation. We have also seen that the default level of any tag is set to INFO.  Now in this section, we will see if we can change the default logging level of the application for a specific tag through the code and if not then whether we can have an alternate implementation.

Ways of changing the default log level for a tag

As per the official documentation provided by Android, there are only a couple of ways to change the Log level for the android.util.Log class. They are as mentioned below.

  • Set a system property: ‘setprop log.tag.< LOG_TAG> <LEVEL>’ Where level is either VERBOSE, DEBUG, INFO, WARN, ERROR, ASSERT, or SUPPRESS.
  • Create a local.prop file that with the following in it: ‘log.tag.<LOG_TAG>=<LEVEL>’ and place that in /data/local.prop.

We have checked how we can set the property by connecting to the ADB shell and then isssuing the command.  Since it involves changing the property, we can explore if we can set the property through Java code. However, System.setProperty() stores a totally different set of properties compared to the properties that can be accessed by the getprop command that can be issued at the ADB shell. Hence even if you try to use the System.setProperty() to store the log level for a tag, it will not work.

So what is the choice?  Let us understand what we are trying to achieve. We want to log debug statements so that they can be viewed in LogCat tool. We already know that irrespective of the logging level set, all the statements are logged into the log file (except for debug statements – since they are stripped outside of the release build). We need some control through the code – probably through a preference settings by which we can log the statements into the logfile which can be easily viewable in Logcat tool.

Approach

Since by default, the debug statements are stripped out of release builds, what we will do is that we will log all our statements using the level INFO. We will wrap all our statements in an IF condition to check the default log level of our application. We will make the default log level of our application as WARN. This means that by default our logger will not write the INFO statements. When we want to actually debug the application on the device, we will change the log level of the application to INFO, so whatever log statements we have put in our application will be written to the log file.

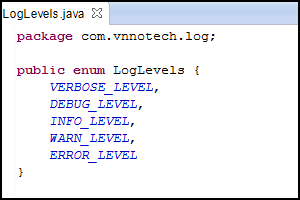
We will be creating two Java files. One is an enum that contains the Log levels specific to our application. The second is a custom Logger class that wraps the actual Android.util.Log class behavior.  Please check the code for the two classes below.

Log Levels

LogLevels.java

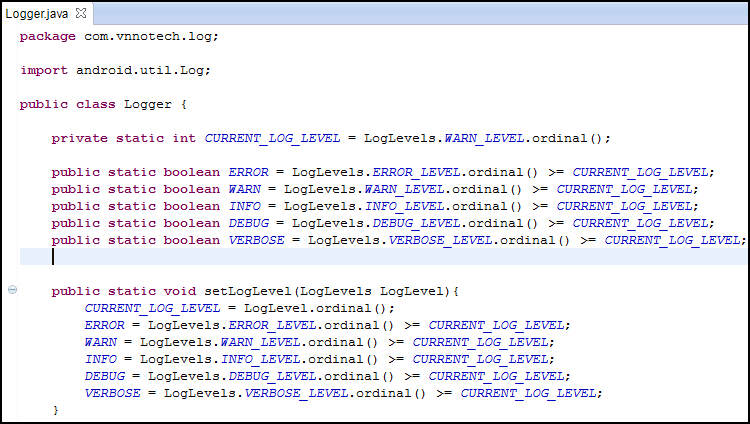
Now we will include this enum in our Logger.java class. Please check the code below.   It shows the various Log levels in action. We have defined the various boolean values as static member variables in our Logger class. The current log level that is set in this class defines  which of the boolean condition is true. We will follow the same convention as that of Log levels followed by the android.util.Log class except that we will make the default level as WARN.  This means that when we write the log statements in our application, log levels of INFO, DEBUG and VERBOSE will not be written by default. Only log levels of WARN and ERROR will be written to the logs in the application and can be viewed in the LogCat tool. If want the log levels of the INFO to be written to the log file, then we have to set the CURRENT_LOG_LEVEL to LogLevel.INFO_LEVEL. This can be done through the setLogLevel(LogLevels LogLevel) operation as shown in the figure below.

Logger.java_1

Logger.java – Setting Current Log Level For The Application

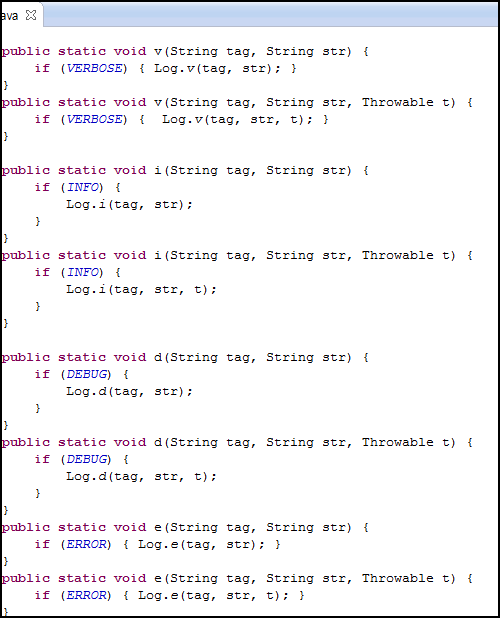
The remainder of the code actual mimics the various log methods provided by the android.util.Log class. For example we have written the operation public static void i(String tag, String str) so the application will use this function in the following manner.

Logger.i(“TAG”, “STRING TO BE LOGGED”);

Notice that the client application does not have to wrap this log statement in IF condition, since the condition of checking the current log level is already present in the Logger class implementation. Thus all client applications need not worry about checking for the conditions and it becomes very easy to use the wrapped android.util.Log statements without having all the log statements being written to the log output by default.

LoggerActivity.java

LoggerActivity.java

Making the log level configurable

We have provided a wrapper implementation of Logger class which wraps the functionality of android.util.Log class with default Log level set to WARN. So when we deploy our application on the device, only log levels of WARN and ERROR will be logged on the device. But we want the functionality that when we want to turn debugging on, we should be able to turn it on or off on the device pretty easily. For this purpose, we also have one public function setLogLevel(LogLevel logLevel). We will develop one preference activity by which we can set the default log level on the device so that the log levels are truly configurable.  Since we do not want to make it very confusing from the end user perspective, we will only provide an option to the user to turn on debugging or turn off debugging. When user turns on debugging, the LogLevel in our application will be set to INFO so that all the logs that we have written in our application will be written into the log file to be viewed in the LogCat tool. When the user turns of the debugging, then the LogLevel would be reset back to “WARN”.

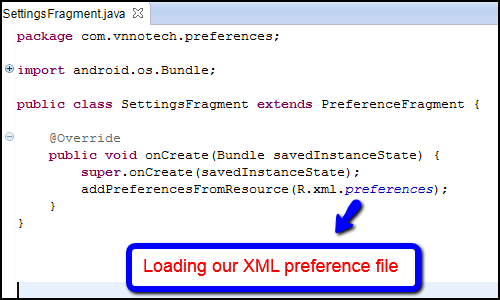
For this purpose, we will create a simple preferences.xml file in the /res/xml folder as shown below. The code for the SettingsActivity.java and SettingsFragment.java are shown after the XML. These are only used to set a preference for the user to turn on or off the debugging mode so that the user can control the logging level.

preferences

Preferences.xml

SettingsFragment.java

SettingsFragment.java

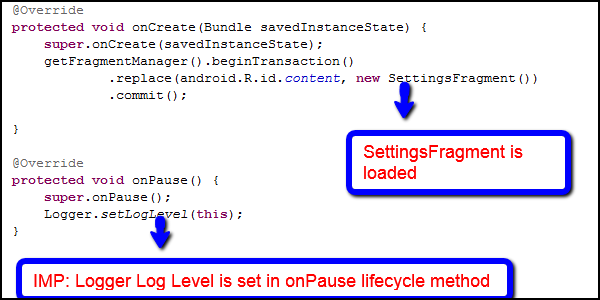
SettingsActivity.java

SettingsActivity.java

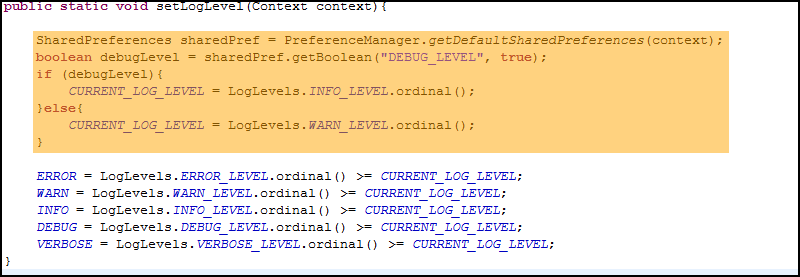
Last but not the least, we will make a modification to our Logger.java class in the setLogLevel() operation. Now, in this case, we are only interested in setting the log level for info or above. Hence we need to make the modification in the setLogLevel() operation as shown below.

Logger.java modified implementation

Logger.java modified implementation

Testing our implementation

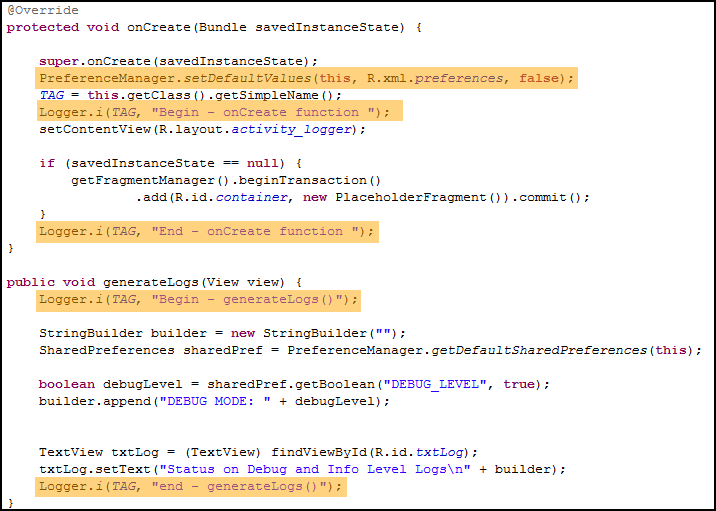
Now that we have made changes to our Logger and also introduced a settings screen, we need to change our main activity code to use the new Logger implementation which should be pretty simple. In the onCreate() method, we first load the preferences that have been defined for this application.

LoggerActivity modified implementation to user our Logger implementation

LoggerActivity modified implementation to user our Logger implementation

Notice that we directly call the Logger.i() function. We do not need to wrap these logging statements in an IF condition since this is already handled for us within the Logger class implementation based on the default log level implementation which is WARN. The user can now turn on or debugging in the settings screen as shown below.

SettingsOption

SettingsOption

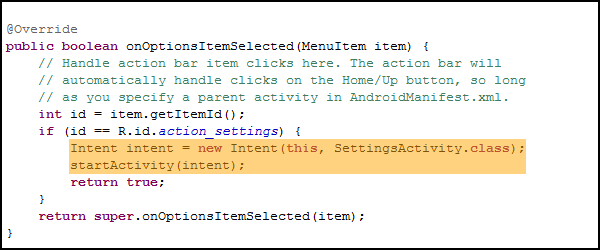
When the user clicks on the settings menu option, we invoke the SettingsActivity screen by creating an intent object and then calling the startActivity() operation.  This is shown in the screen below.

Invoking the SettingsActivity

Invoking the SettingsActivity

Debug Settings

Debug Settings

User can change the debug settings here. If the user checks the box, it means debugging is on and all the Logger.i() calls will be logged to the log file. If the user unchecks this option, it means debugging is off and all the Logger.i() calls will NOT BE logged to the log file.

Thus we have implemented a simple configurable mechanism of controlling the logs that get generated to the device log file which can be viewed through the LogCat tool. To make the solution truly reusable across multiple applications, we need to put the Logger class, the LogLevels enumeration and the SettingsActivity and SettingsFragment in a library project that can then be used across different applications.

Conclusion

In this part, we took a look at how we can wrap the calls to the android.util.Log operations in our own implementation of Logger class. There are only a couple of ways of changing the Log level which is through the setprop command from the adb shell. But we want to have this option configurable as a setting from our application. So we created an enumeration of the log levels, provided a settings fragment class where user can turn on whether debugging should be on or off for the application.   In our implementation, we have kept the default Log level of the application as WARN. When the user turns on debugging, we are changing the log level in our application to INFO. So when user turns on the DEBUG option, all the Logger.i() functions will write their log entries into the log file to be viewed in the LogCat tool.   Since the debug statements are removed out of the final release build, we are controlling the Log level INFO through our settings. Thus we have provided a simple configurable way to control the logging from our application which can be turned on for debugging purposes or off when the user does not require it.

Happy Learning!!!
 

21Jul/14

Logging in Android – Part I

Introduction

In this topic and the next one in the series, we will take a look at the logging faciility available in the Android platform. Whenever we develop any application, we normally put in log statements in the code. As per the industry standards the log levels are classified based on their severity. So for example in Android platform, we have different logging levels such as VERBOSE, DEBUG, INFO, WARN, ERROR, ASSERT and SUPPRESS. In this part of the session, we will take a look at what is the default logging level in the Android platform and what are the ways to change the logging level in an application already deployed onto the device.

Sample Application

To explore the various levels of logging in the Android platform, let us create a very simple application. The application will have one activity with a TextView and a Button control. We will put several log statements in the onCreate function and the event handler that we will develop for the Button control.

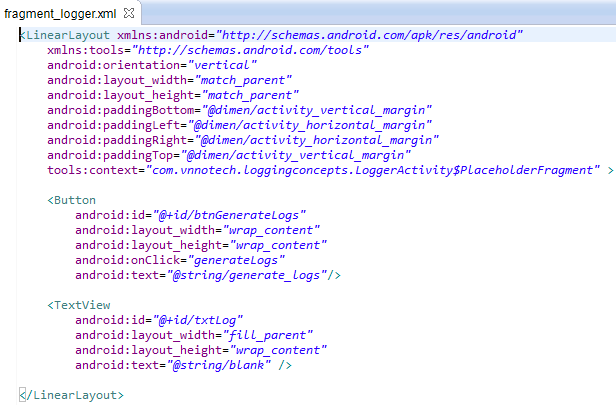
The following is the fragment_logger.xml file.

fragment_loggerFragment_Logger.xml

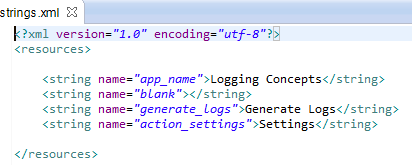
Notice that we have only one Button with the function called generateLogs() as the onClick event handler. We will take a look at the Strings.xml file and then at the code before we start with looking at the log levels code.

StringsStrings.xml

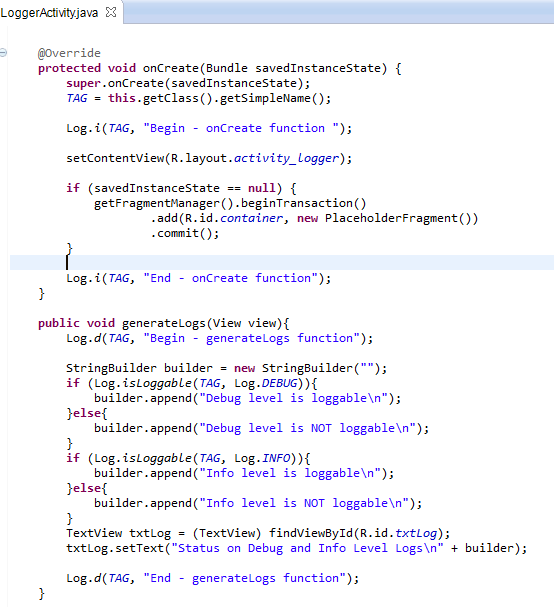
The code from the LoggerActivity.java is shown below. The entire code is not depicted. Only the code from the onCreate() and the generateLogs() function is presented here. We are using the default Log class provided in the package android.util.

LoggerActivityLoggerActivity.java

Logging

Logging in Android is provided through the class called Log which resides in the android.util package. As seen in the code, we can write out log statements such as

Log.i(TAG, “message”);

Here the static function “i” means informative message, statiic function “d” means debug message and so on. All the log statements are written in the output file as shown in the LogCat window.

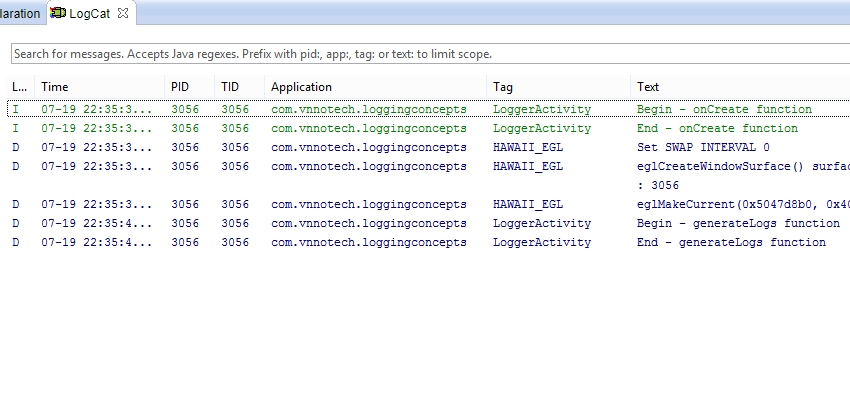
Logs1LogCat output for above logging

As seen both the iinformational messages as well as debug messages are printed in the LogCat window. The informational messages are generated from the onCreate() function while the debug messages were written from the generateLogs function. In the generateLogs() function, we are invoking the function isLoggable(TAG, Log_LeveL) to see whether the log level for the specified tag is loggable or not. Now comes the interesting part. Let us see the output of the above code when executed on an actual device.

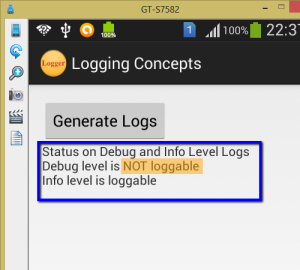
Logs2The Debug level is NOT loggable

isLoggable function

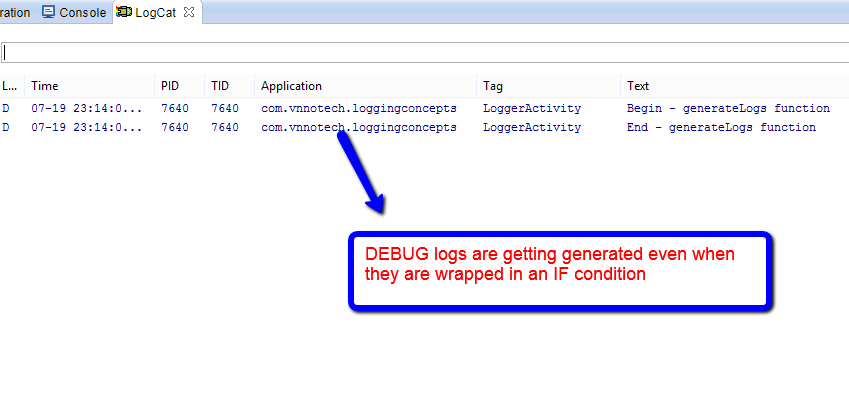
As mentioned the isLoggable operation checks whether or not a log for the specified tag is loggable at the specified level. But even though the output above shows that the DEBUG level is NOT loggable for our tag, it is still written in the LogCat window. So it really means that the Android system writes the log information irrespective of this setting. So how do we control this?

We have to explicitly call isLoggable on the specified tag and specified level. When the condition returns true, we shoulld make a call to the Logger. This is shown below.

       if (Log.isLoggable(TAG, Log.INFO)){

               Log.i(TAG, “Begin – onCreate function ” + “log.tag.” + TAG);

     }

       if (Log.isLoggable(TAG, Log.DEBUG)){

               Log.d(TAG, “Begin – generateLogs function”);

       }

Thus the log statement should be written in the appropriate condition. With the above condition in place, if we execute our application again, the following output is generated in the LogCat window.

Logs3The debug statements in the generateLogs() function is not displayed

As noticed in the LogCat window, the debug statements in the generateLogs() function do not appear in the output.

So what is the default log level for any tag within Android platform? The default level for any tag within the Android system is Log.INFO. The reason is that we have put the log statements within the isLoggable() condition. As the default log level for the Android platform for any tag is INFO, the condition will evaluate to false. Hence the log statement will never be executed. That is the reason we saw earlier that Debug level is NOT loggable. So how do we change the log level for a device?

Changing the log level of a device – setting property from the ADB Shell

Ensure that the device is connected to the USB port of your laptop and that the USB debugging is enabled. Execute the ADB shell command and type in the following command.

Logs4

Setting the Log Level Property through ADB Shell

The command is setprop Log.tag.<YourTagName> DEBUG.

In our case, we substituted <YourTagName> with LoggerActivity.Now we will execute our application on the mobile device again and see the statements that appear in the LogCat window and also the output that appears on the application screen.

Logs5The debug statements for the generateLogs() function appear in LogCat

Since now we have changed the default level of logging for our tag (i.e. LoggerActivity) to debug, all our logs for debug level now appear in the output of LogCat. Let us check the application screen also.

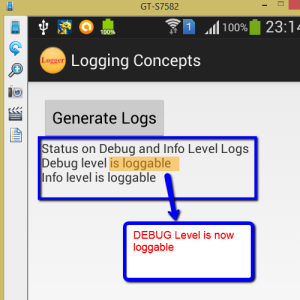
Logs6Debug level is loggable

With the setprop command that we executed from the ADB shell window, we have now made sure that the debug level is loggable. Is that the only way to change the log level in the Android platform?

Changing the log level of a device – through properties file

There is a second way of changing the default logging level. This is done with the help of properties file. We need to create a local.prop file. The contents of the file would be as follows:

‘log.tag.< YourTagName >=<LOG_LEVEL>’.

The file needs to be placed in the /data directory and should be available as => /data/local.prop.

NOTE: Access to the /data directory is restricted and hence this method of changing the logging level seems impractical on the Android device.

Conclusion

In this part, we have seen how the Log class behaves and how it writes the log statements. It basically writes out all the log statements to the output irrespective of the default logging level set on the Android platform. So we wrapped all the logging statements in an IF condition to check if the logging level for that specific tag is allowed or not. If the logging level for that specific tag is supported, then the log statements are written to the output else they will not be written. This gives control over when the logging statements should be written or not written.

In this session, we have seen that the default logging level for any tag in the Android platform is Log Level INFO. So if, we want to write debug statements with the isLoggable() condition, the debug statements will never get written to the output.

So we need a way to change the default log level. This is achieved by either setting the property of the logging level through the ADB shell or by creating a local.prop file and storing it in the /data directory. To set this property through both of these options, we need to have the device connected to the PC through USB cable with USB debugging enabled.

Are there any other ways of changing the log level -> may be programmatically when the application is actually being executed on the device? – Well, let us explore this option in part 2 of this series.

Happy Learning!!!

09Jun/14

Why Learn Android Programming

Why Learn Android Programming?

The IT Job market is on the rise and one of the top job from the top jobs list include Mobile application development. The ramp of Mobile will impact all forms of technology and will continue with its pace. So along with it comes the need for talent to drive those processes and hence lot of organizations are looking forward to hire programmers in mobile development space. People from all over are switching from laptops and notebooks to smartphones for many things.

There are various smart phone operating systems(OS) available like Android, iOS, Blackberry, Windows Mobile, Symbian etc. Among all of them Android stands out as the winner with no other competitor even near to it in terms of its user base. Android has a huge market share and almost 300 million smart phones run Android OS. It looks set to completely dominate the high growth in developing markets and has set the stage to increase it further.

  • Among the developing markets, India ranks only behind to China in terms of the smart phone users which is just 10 % of the overall mobile users base. So there is a huge potential going forward for growth in India itself.
  • In India each subscriber average is almost 2 SIM cards so the current active mobile connections is 760 million and the number of registered mobile connection is 889 million.
  • Projections suggests that Active mobile connections in India should exceed 900 million by 2016 and the use of smart phones will increase very rapidly.
  • The average time by an Indian user on mobile apps is around 70 to 75 minutes per day.
  • The revenue generated by Mobile value added services is expected to grow and touch around Rs. 500 billion by 2015.

More importantly, According to IDC, Android enjoys 91% of market share in India and the second nearest is windows which is just 5.4%. So considering the value added services growth and the market share of Android it is pretty clear that is a huge potential for Android based application development.

The salary range in India for an entry level android application developers is in the range of 3 lacs to 4.5 lacs PA. The job locations for Android developers is across India. One should have good hands-on knowledge on Java before taking up Android programming.

Hope it is pretty clear that learning android programming will help you to have a bright career in the challenging and growth oriented IT sector.

Happy Learning!!


02Jun/14

Lambda Expressions – Part I

Lambda expressions

Introduction

Java as a programming language has evolved continuously over various versions adding new features like Swing, NIO, Annotations, Generics, Auto-boxing, Java FX and the latest Java 8 has introduced the much awaited very important feature Lambda expressions.

The typical usage of several interfaces like ActionListener, Runnable etc. were as anonymous classes inside the code where it is used. One single alternative to writing an anonymous class would have been writing a separate class for each interface thus increasing the number of classes. If you look closely at each of these interfaces there is only a single method inside each of these interfaces. Lambda expression provides a very clear and concise way to represent one method interface using an expression. Along with Java 8, an interface like ActionListener, Runnable that follows this pattern is called as a “Functional Interface“.

Let us Dig further

The following table depicts the composition of a Lambda expression:

LBComposition


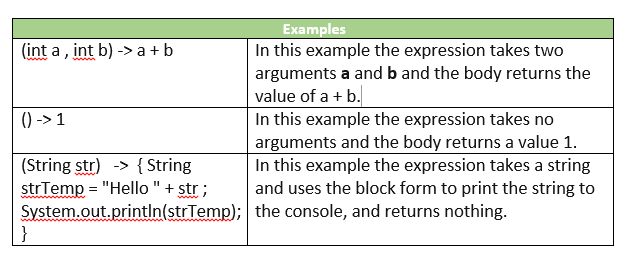
Let us have a look at the examples using the above parts in the following picture:

LDexamples

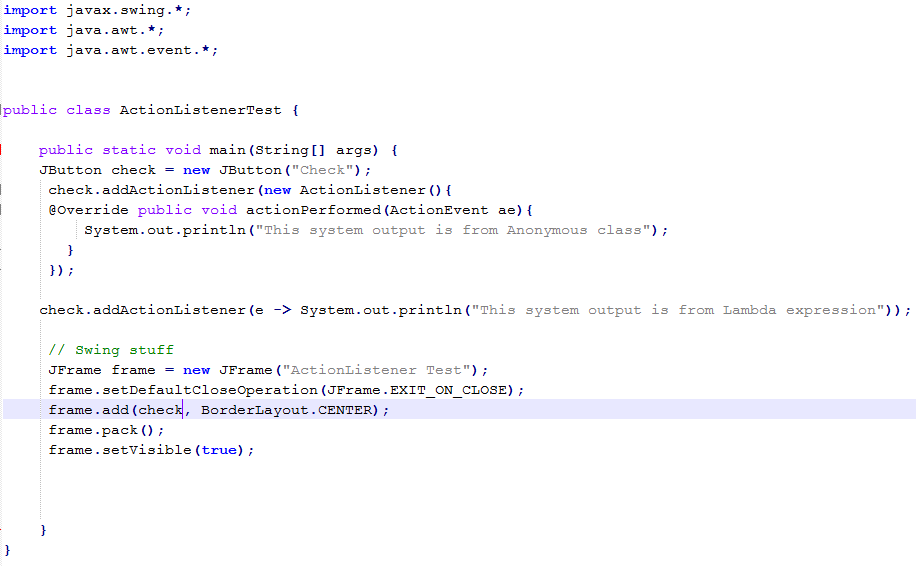
Lambda expressions reduces the number of lines of code which are required in case of anonymous classes. Let us run through a quick example of the ActionListener using Anonymous class and make the code shorter using Lambda expression.

ActionListener

As you can see from the class above the five lines of code for adding an anonymous class is done in just one line of code. When the program and click the check button following output is seen on your console:

ActionListeneroutput

Note: In the above scenario lambda expression is also passed as a parameter.

Java 8, comes with a set of standard functional interfaces and is part of java.util.function package. Out of these standard functional interfaces let us understand the Predicate interface which is as below:

public interface Predicate<T>{
   public boolean test(T t);
}

The test method takes a generic class and returns a boolean result.

Consider one example in which you have to place an order for items whose quantity is less than or equal to 10. Prior to Java 8, one would hard code the comparison inside the method while iterating over the collection of items. Using Lambda expressions functional interface Predicate life becomes easier as seen below in the code example.

Consider the class Item.java

import java.util.List;
import java.util.ArrayList;
public class Item {
  
  private Item(Item.Builder builder){
   id = builder.id;
   qty = builder.qty;
   itemName = builder.itemName;
  }
  private Item(){
   super();
  }
  
  private long id;
  private String itemName;
  private int qty;
  
  public long getId(){
   return id;
  }
  
  public int getQty(){
   return qty;
  }
  public String getItemName(){
   return itemName;
  }
  
  public void setId(long id){
   this.id = id;
  }
  
  public void setQty(int qty){
   this.qty = qty;
  }
  public String setItemName(String itemName){
   return itemName;
  }
  public static List<Item> createItemList(){
   List<Item> items = new ArrayList<Item>();
   
   items.add(
   new Item.Builder()
            .id(1)
            .itemName("Screw")
            .qty(10)
            .build() );
   
   items.add(
   new Item.Builder()
            .id(2)
            .itemName("Bolt-12")
            .qty(9)
            .build() );
   
   items.add(
   new Item.Builder()
            .id(3)
            .itemName("Bolt-14")
            .qty(12)
            .build() );
    
    for(Item i : items){
     System.out.println(i.getItemName());
    }
   
   return items;
  }  
 
  public static class Builder{
  
   private long id = 0;
   private String itemName = "";
   private int qty = 0;
   
   public Item.Builder id(long id){
     this.id = id;
     return this;
   }
   
   public Item.Builder itemName (String itemName){
     this.itemName = itemName;
     return this;
   }
   public Item.Builder qty(int qty){
     this.qty = qty;
     return this;
   }
   public Item build(){
    return new Item(this);
   }
    }
 }

Now let us code the OrderManager class in which there is a method for ordering the items if they lie below or equal to the required quantity.

import java.util.*;
import java.util.function.Predicate;
public class OrderManager{
 public void placeOrder(List<Item> items, Predicate<Item> pred){
  for(Item item: items){
   if(pred.test(item)){
    System.out.println("Place order for item : " + item.getItemName());
   }
  }
 }
}

The class PredicateTest.java for passing the predicate to the reorder method.

import java.util.List;
import java.util.function.Predicate;
public class PredicateTest {
 public static void main(String[] args){
 
  List<Item> items = Item.createItemList();
  
  OrderManager mgr = new OrderManager();
  
  Predicate<Item> reorder = i -> i.getQty() <= 10;
  
  mgr.placeOrder(items, reorder);
 
 }
}

Finally, the output on the console:

Predicate

The output seen above shows that we have to place the order for item Screw and Bolt-12.

Following are some set of standard interfaces which also has a primitive version.

  • Consumer: An action to be performed with the object passed as argument
  • Function: Transform a T to a U
  • Supplier: Provide an instance of a T (such as a factory)
  • UnaryOperator: A unary operator from T -> T
  • BinaryOperator: A binary operator from (T, T) -> T

In this part it might have become clear about the Lambda expressions syntax, Lambda expressions will replace anonymous inner classes, and Predicate used for checking or testing on a list. In the next tutorial we will cover a bit further on Lambda expressions and its usage on collections.

Happy Learning!!!